Venus flytraps reproduce through multiple methods. They can propagate in the wild or in a controlled environment. In this article, you will learn the 4 methods to propagate Venus flytraps.
Venus flytraps reproduce sexually through flower pollination and asexually through rhizome division. Growers can also propagate Venus flytraps by employing leaf cuttings and flower stalks.
Venus flytraps reproduce in different ways. Keep on reading this article to get the step by step process of how to propagate your plant. You can end up having dozens of them in no time! Now, let’s cover the four reproduction methods:
- Sexual propagation through flower pollination
- Rhizome divisions
- Leaf-cutting
- Flower stalk cutting
Venus Flytrap Sexual Reproduction
Flower Pollination
Venus flytraps can reproduce sexually. Every spring, after achieving maturity, Venus flytraps produce flowers. The plant produces multiple flower stalks. And those flower stalks end in flower bunches.
In general, Venus flytraps grow very fast. And, the flower stalks also grow quickly. Within a few days, the flower stalks surpass the height of the plant and continue to grow. Finally, the flower buds flourish and produce white flowers with green veins.
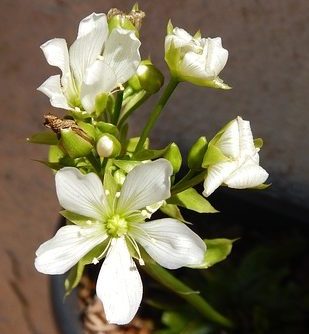
In outdoor locations, pollinators are attracted to the flowers and fertilize them. Venus flytraps use an intelligent mechanism for consuming the pollinators. The leaves of a Venus flytrap do not extend too far from the ground as they are usually about 5 inches (adults). But, the flowers grow up taller than the traps. With this method, venus flytraps separate prey from pollinators.
Once a flower is fertilized, it will start to wither. The plant dries up and leaves behind multiple tiny seeds.
For a complete step by step process, read this article on flower stalk propagation.
Are Venus flytraps self-pollinating?
Venus flytraps are self-pollinating; a flower within the plant can be fertilized with its own pollen or with the pollen of other flower in the plant. The seeds obtain through self-pollination will produce very similar plants to the parent. However, the new plants won’t be exact clones.
The other option besides self-pollination is cross-pollination. In cross-pollination, a flower is pollinated by pollen from a flower in another plant.
Self-pollination vs Cross-pollination
Venus flytraps can both self-pollinate and cross-pollinate. However, some benefits come from each option. Self-pollination allows for more uniform plants. Also, self-pollination capabilities increase the chances of reproduction. However, cross-pollination, due to the genetic variety, produces more vigorous offspring.
How to Pollinate a Venus Flytrap and Harvest Seeds
Now, it is time to learn step by step, how to pollinate a Venus flytrap. Venus flytraps living outdoors might have access to pollinators. But, if you are serious about harvesting seeds, you must pollinate the flowers yourself and ensure your plant reproduces. Here are the step by step instructions:
- Let your plant flower.
- Gather a suitable tool to pollinate the flowers. Some good options are soft paintbrushes or Q-tips.
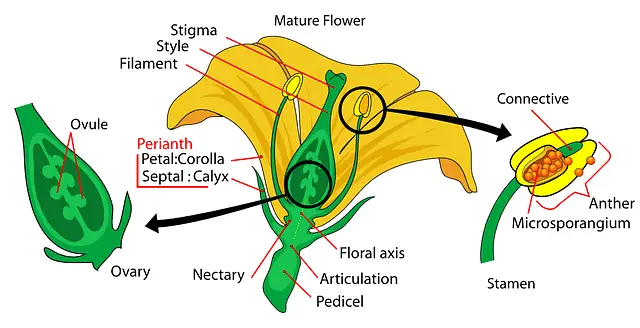
- Examine one flower and identify the two parts: the anther and the stigma. The anther holds pollen and is located at the end of thin filaments. The stigma is located in the center and is where pollen germinates. The diagram below can serve you as a guide.
- Utilize the paintbrush or Q-tip and brush the anther to collect the pollen.
- Transfer the pollen from your tool to the stigma. You can transfer it to the stigma of a flower in the same plant or choose another plant for cross-pollination.
- Do not stop after pollinating a single flower. Continue to pollinate the rest. The more fertilized flowers, the more seeds you will obtain.
- Wait a couple of days to confirm the flowers were pollinated. Fertilized flowers will wither and leave seeds behind.
- Examine the remains of the dried up flower and look for the seeds. Each flower produces a few dozens of seeds.
- Once you located the seeds is time to extract them. Since Venus flytrap seeds are very tiny, do not attempt to harvest the seeds outdoors on a windy day. The seeds can easily be carried away. Instead, continue the operation indoors. I like to enclose all the remains of the flower in a Ziploc bag. Then, while still in the bugs, I remove the dead tissue and separate the seeds.
If you want to learn exactly what it means when your Venus flytrap flowers, you can read this article for more information.
How to Plant Venus Flytrap Seeds
Many online shops offer Venus flytrap seeds. It is possible to buy seeds online, but it can be risky. The best way to obtain the seeds is to harvest them yourself. But the cycle does not end with just collecting seeds. It is time to sow them and wait for them to germinate. First, Venus flytrap seeds do not need further preparation before planting. You can grow them directly by following the instructions below.
First, let’s gather some basic ingredients:
- A shallow plastic container with a water tray
- Carnivorous plant soil: Always employ nutrient-free media. This article covers the best options: Best Soil Options for Venus Flytrap.
- A gallon of distilled water
- Light source: You can employ natural light or fluorescent LED plant lights
- Sulfur-based fungicide (optional).
- Spray bottle
Sowing Instructions
- Grab the potting media and moisten it thoroughly. Only use distilled or rainwater. In the end, the medium should be humid all around.
- Add the soil to the potting container.
- Place the potting container on top of its water tray. Then, add about half an inch of distilled water to the water tray.
- Optional: add small amounts of fungicide to the soil.
- Sprinkle the seeds in the potting media. Try to spread them out, but do not be too worried about separating all of them. Seedlings will be tiny and will barely take up any space.
- Gently press the seeds toward the grounds.
- Fill the spray bottle with distilled water and mist your plants from the top.
- Place the trays in a spot where they can receive indirect sunlight for more than 4 hours.
- During the next few weeks, ensure the soil is always humid. Also, they should remain within this temperature range: 78 F – 90 F.
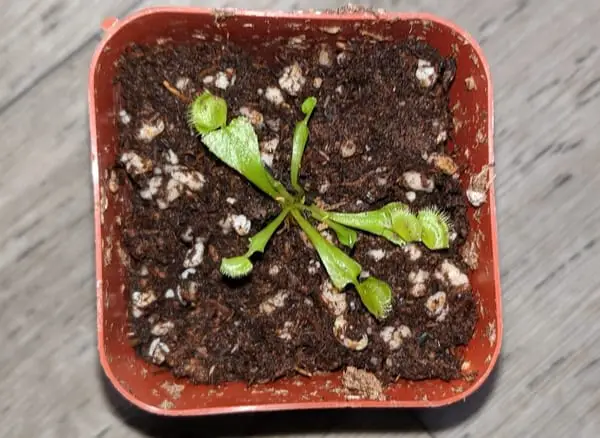
- In 3 to 6 weeks, you will start seeing tiny Venus flytraps germinating from those seeds.
After harvesting seeds, it is normal to wait a few weeks to sow the seeds. However, if you plan on storing the seeds for extended amounts of time, you must place them under refrigeration. Then, they can last for months.
A Debate About the Venus Flytrap Flowers
Often, there is a debate between Venus flytrap owners. Some believe flowers must be cut off to prevent flowering. Others just let their plant flourish. The reasoning behind the first point of view is simple. Venus flytraps focus on reproduction during the spring. They spend substantial amounts of energy generating flowers and hoping they get pollinated. As a novice grower, it is recommended to skip the flowering process. Then, if the plant is not receiving optimal care, it will overcome the challenges.
Venus flytraps do not self destruct when producing flowers. It is entirely safe to let plants undergo the reproductive season. However, you must be confident in your setup. Here is a diagram that can help you decide between letting your plant flower or not.
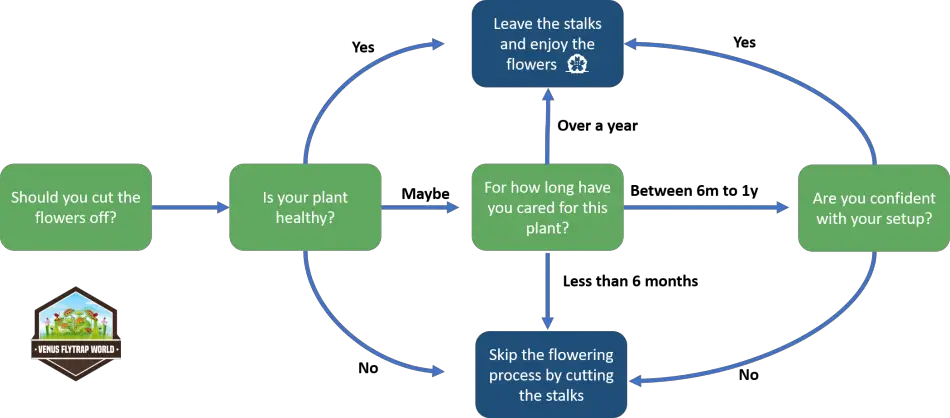
If you are interested in harvesting seeds and producing seedlings, you should focus on making sure the plant is under proper care. Pollinating Venus flytraps and harvesting their seeds is not a complicated process, but it is gratifying.
Venus Flytrap Rhizome Divisions
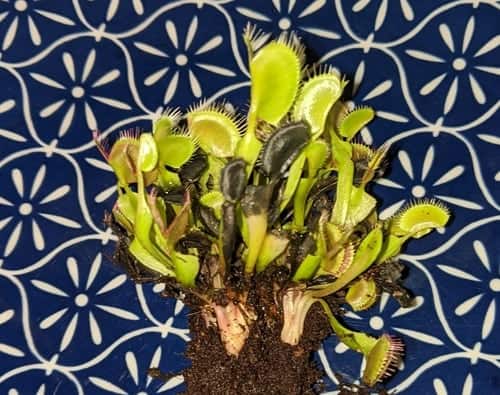
The Venus Flytrap also reproduces via rhizome division (vegetative propagation). Venus flytraps usually exhibit 3 to 7 healthy leaves at a time. When you see a Venus flytrap with multiple heads, like, for example, 15 or 20, then that is not a single plant. The original plant has propagated and created clones of itself.
At first, the roots are connected between the parent plant and the clone. But, then the roots divide, and the clone develops an independent root system.
After a Venus flytrap has propagated via rhizome, you can easily separate the plant and pot each plant independently.
I bought this plant in the picture below. As soon as I saw it, I knew there had to be at least four independent Venus flytraps in that small space. It needed to be repotted, and it could be easily divided.
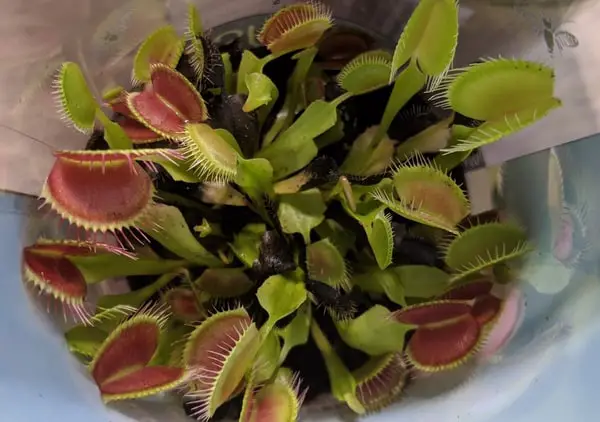
After splitting the plant, I got six young Venus flytraps and one baby one. They are growing strong in the appropriate pots.
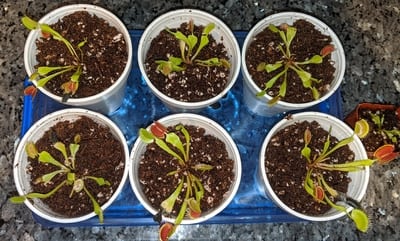
To obtain multiple plants from a single one, you must wait until the parent plant divides naturally. It is not completely necessary to separate them. But as shown in the photo example above, some plants grow out of their containers and need more space. There are two best times to divide a Venus flytrap:
- At the end of dormancy: the plant will exit dormancy in a new medium and grow.
- During the start or mid-summer: the plant will have time to adapt to its new environment before entering dormancy.
You can learn how to divide your plant by following these instructions:
- Remove the plant from its pot. You can moisten the soil beforehand to make the operation easier.
- Carefully remove the soil in the roots of the plants. Start by removing the outer layer. Then, you will be left with a core. The last pieces of dirt are the hardest to remove. Do not get frustrated. Just continue to remove the soil. You can employ a spray bottled to break up solidified pieces.
- Inspect the roots and bulbs of the plant. The bulb should be white and of firm consistency. The roots are long and dark. As you observe the plant, you will notice some separations in the bulb.
- Without harming the rhizomes, separate each plant, making sure each of them has its own independent roots.
- Place the bare-root plants on top of a paper towel or a container.
- Trim the plants. Now, it is the best time to prune the Venus flytraps. When they are bare root you can remove those black leaves altogether. Also, at this point, you can extract leaf cuttings (more information in the next section.)
- Prepare independent pots for each. Or a container for multiple. Placing multiple plants in a single pot is possible, but make sure there is enough space.
- Plant all the Venus flytrap.
- Continue to provide proper care and focus on water and humidity levels. Venus flytraps weaken after repotting. Ensure the potting medium is always moist.
Venus Flytrap Leaf-cutting
It is possible to extract a Venus flytrap leaf attached to part of the rhizome and produce a new plant. This process is called leaf cuttings. The best time to pull leaf cuttings is during the spring or summer. Do not attempt this method during dormancy. Here is how it works, step by step.
- Place a bare root Venus flytrap on top of a surface.
- Identify a healthy leaf on the outer layer of leaves in the rhizome.
- Grab the leaf from the top and gently but firmly pull in downwards. The leaf should have a small portion of the rhizome in its base.
- Collect a couple of leaf cuttings to increase your chances of propagating the plant.
- Place the leaf cuttings in a container with humid carnivorous plant soil by laying them on their side.
- Cover the base of the leaf-cutting with some of the soil.
For the next weeks, provide the standard Venus flytrap care to this leaf cuttings. They should have access to sunlight, a humid environment, and adequate amounts of nutrient-free water.
Venus Flytrap Flower Stalk Cutting
You can also propagate Venus flytraps through flower stalk cuttings. If you decide to cut the flower stalks off your plant, do not throw them away. You can plant them and propagate your plant. This section will teach you how to multiply your plants through flower stalk cuttings.
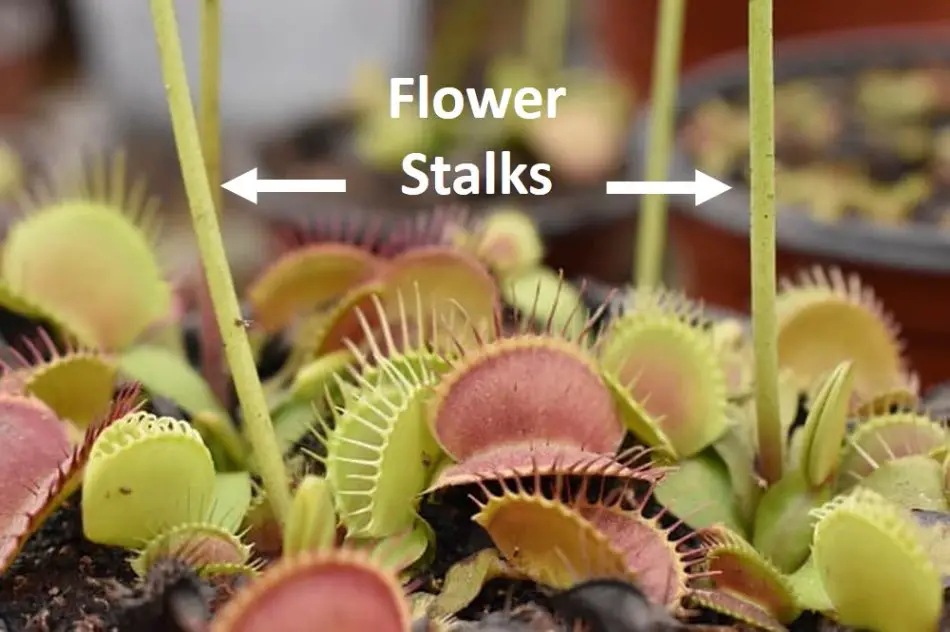
First, collect the basic ingredients:
- Plastic or glazed ceramic pot with a drainage hole
- Water tray for your selected pot
- Distilled water
- Scissors
- Carnivorous plant soil
Wait until your plant has produced flower stalks. The stalks should be at least 5 inches long to continue this procedure. For best results, wait until the plant has produced flower buds. Then, you will have a better chance of producing baby Venus flytrap.
Follow these instructions for flower stalk propagation:
- Add distilled water to the carnivorous plant soil until it is humid all around.
- Introduce the soil inside the pot
- Place the pot on top of the water tray. And fill the tray with about half an inch of distilled water.
- Employ the scissors to cut the flower stalks as close to the rhizome as possible. Cut all the flower stalks in the plant.
- Cut each flower stalk into smaller pieces at about 2-3 inches in length.
- Grab half of the stalks and vertically insert them in the soil. Bury about a quarter of an inch underground. Then, push some soil around the stalks to set them securely in place.
- Place the second half of flower stalks and place them horizontally to the ground. Then, press them gently towards the soil, until half of the stem is underground. After, push some of the soil in the edges and cover the tips of the stalk.
There are two commonly used methods: placing the stalks vertically and horizontally. For better results, I recommend to give them a 50-50 try. Once you completed the instructions, you are all set. Make sure the flower stalks remain in moist soil at all times. Also, they need exposure to sunlight. After 4-6 weeks, the stalks will start generating roots. Best of luck!
Final Thoughts
I hope you are successful at propagating your plant. Growing Venus flytraps from seeds or through divisions is a rewarding experience. Regardless of the propagation method, you employ, make sure the plant is healthy. This downloadable care sheet contains all the information you need to care for Venus flytraps. No need to sign up; just download it from this page:


