Is SmartWater Good for Venus Fly Traps?

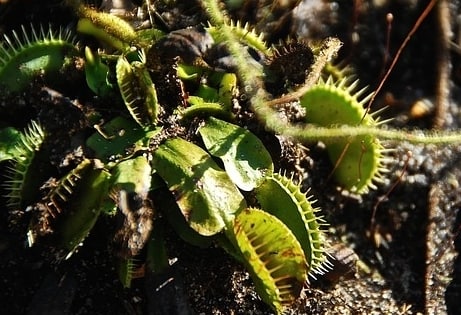
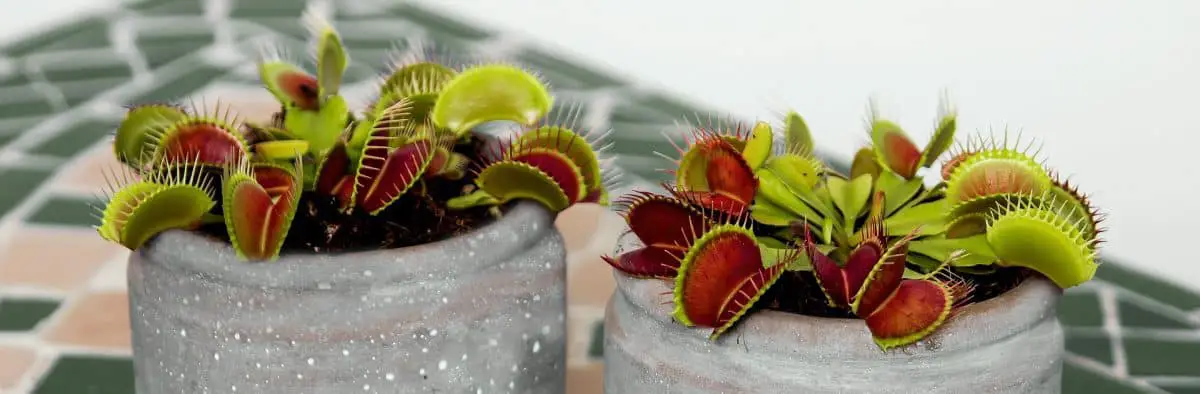
To keep Venus flytraps healthy, they should only be watered with pure water sources. But, how pure does the water need to be? Is SmartWater acceptable for Venus flytraps?

SmartWater contains 20 to 27 parts per million (ppm), which is below the maximum level (50 ppm) recommended for Venus flytraps. SmartWater is acceptable for Venus flytraps; but, distilled water, reverse osmosis water, and rainwater are optimal for carnivorous plants.

This article will give you an overview of which water works best for Venus flytraps. The recommendations below will help you keep your plant healthy and thriving.

Is SmartWater Safe for Venus Fly Traps?

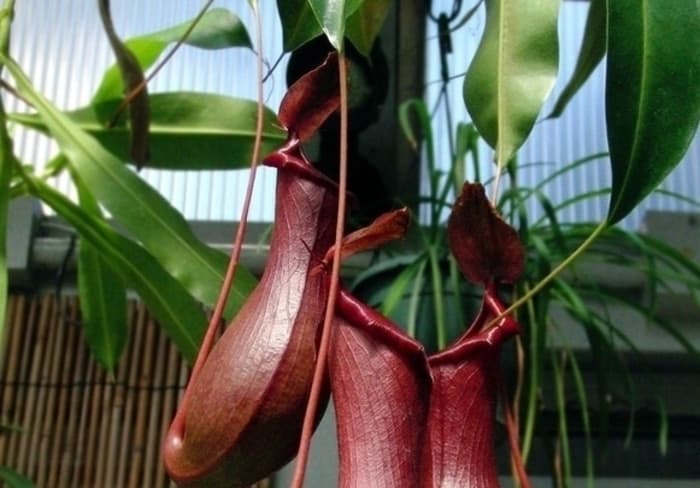
In the wild, Venus flytraps have little to no exposure to nutrients in the soil or water. As a result, they have developed an intolerance to minerals and nutrients. Electrolytes in standard bottled water and other additives can be harmful to Venus flytraps.

Venus flytraps should only be water with pure water sources. But, what is pure? The general recommendation is to employ water with less than 50 parts per million (50 ppm). Such measurement is an indicator of how many dissolved solids are in the water. Lower measurements are very beneficial for Venus flytraps.

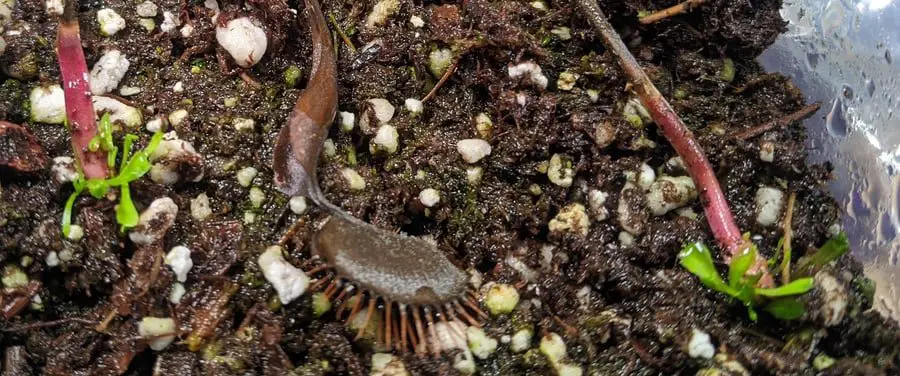
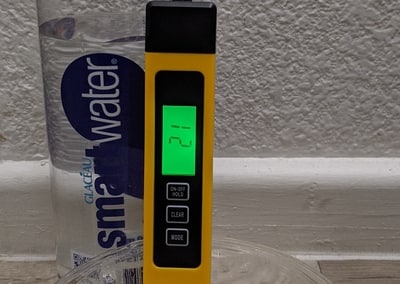
A Total Dissolved Solids (TDS) meter can measure the ppm in different water sources. The measuring process is straightforward (dip the tool in the water and see the result), and you can buy a TDS meter for less than 20 dollars. Here is a link to the one I use so that you can check the current price and specs on Amazon.com.

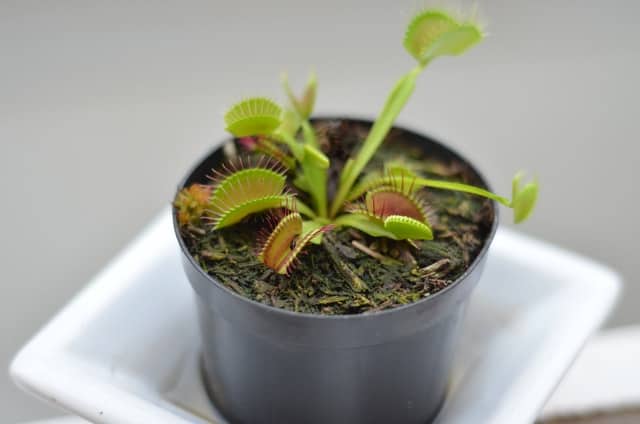
I used a TDS meter to assess if SmartWater is safe for Venus flytraps. The picture below shows my simple setup and the reading of 21 ppm.

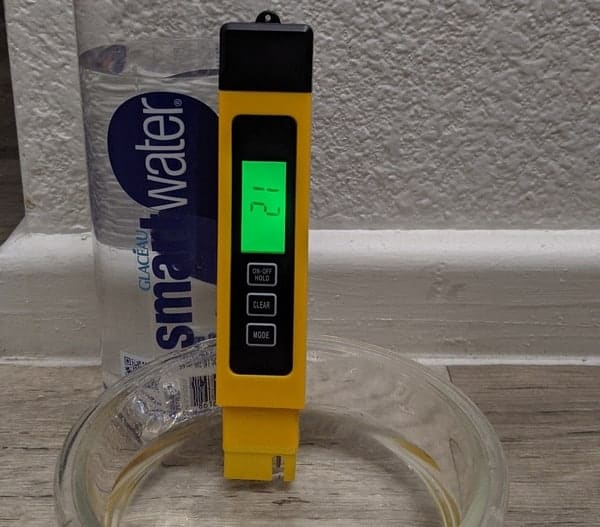
SmartWater contains 20-27 ppm, which is within the acceptable range for Venus flytraps. However, the best water sources for Venus flytraps contain zero (or close to 0) ppm. Pure distilled water and reverse osmosis water have 0 ppm.

Is SmartWater distilled water?

SmartWater is purified through a distillation process. It also contains additives for flavor, which are beneficial for humans but harmful for Venus flytraps and other carnivorous plants.

Personally, I would feel confident employing SmartWater if I do not have many options. Due to its cost and mineral content, using a cheaper and purer option is the best approach.

In the next section, you will learn the best and worst water sources for Venus flytraps.

Water for Venus Flytraps: SmartWater vs Others

SmartWater does not contain a large number of dissolved solids. With many different water options out there, there are many better options and many much worst. In this section, we will compare it to other water sources.

The Best Water for Venus Flytraps

These three water types contain zero or close to zero 0 ppm. They are pure water, which is completely safe for Venus flytraps.

  • Distilled water
  • Reverse osmosis water
  • Rainwater

Pure distilled water and reverse osmosis water contain 0 ppm. They are relatively cheap and easy to find in most grocery stores. Both options are equally suitable for venus flytraps. However, most venus flytrap owners tend to use distilled water more often.

Distilled water is more readily available and cheaper than reverse osmosis water. I buy distilled water in water and ice stores for 20 cents a gallon. Also, you can find them for a dollar a gallon in most food stores.

Rainwater usually contains 0 ppm or a very low number. In the wild, Venus flytraps rely on rainwater almost exclusively. Collecting rainwater usually requires building a setup, but rainwater is optimal water for Venus flytraps if you have one in place.

The Worst Water for Venus Flytraps

  • Tap water
  • Boiled water
  • Filtered water

Tap water quality varies across cities and even neighborhoods. Generally, tap water can be extremely harmful to Venus flytraps as it might contain over 100 ppm.

I measured the tap water quality in my home with a TDS meter and measured results of over 500 ppm consistently over several days. Such a high amount of solids would definitely kill a Venus flytrap over time.

Tap water ppm measurement

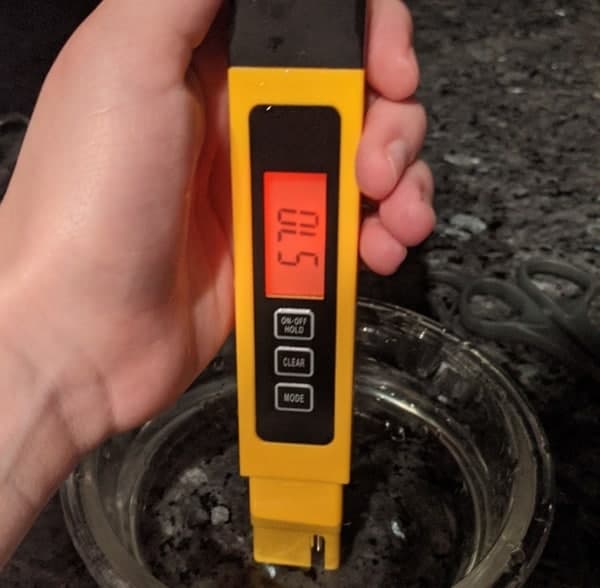
Not all tap water quality is the same. Due to the variability, you shouldn’t risk your plant by employing tap water blindly. Measure the water composition with a TDS meter or buy distilled water to be safe.

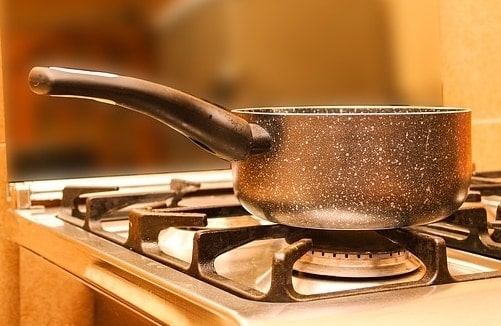
Boiling tap water kills bacteria but does not help extract minerals and additives in the water. On the contrary, it can make water less suitable for carnivorous plants as it retains the soils, but you end up with fewer liquids.

Filtering tap water can eliminate some particles in the water, but it is usually not enough. Only employ this method if you have a TDS meter, and you can verify the filter is helping substantially.

Minerals in the water do not kill Venus flytraps immediately, but they weaken the plant. Then, they start building up in the soil and can eventually kill the plant. For this reason, employing the incorrect water source can be extremely dangerous.

SmartWater vs Others

Distilled water, reverse osmosis, or rainwater are optimal for Venus flytraps. SmartWater has an acceptable composition but is substantially worst (0 ppm vs. 20-30 ppm). Tap water, filtered water, and boiled water usually contain many harmful minerals for Venus flytraps.

How to Water Venus Flytraps

Now that you learned what water is best for Venus flytraps, we can cover an overview of how to water a Venus flytrap.

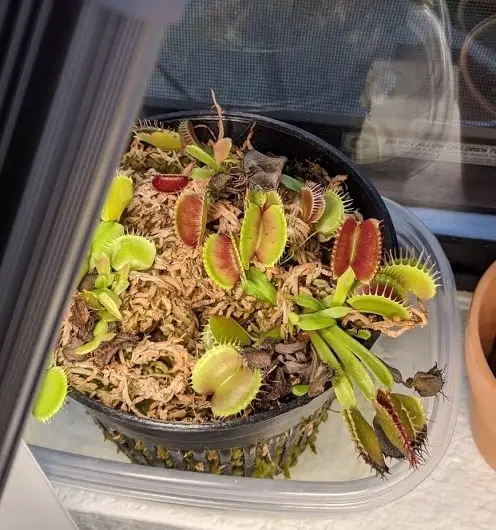
The process of watering Venus flytraps is critical. Venus flytraps require consistently humid environments year-round. The soil must be moist at all times but not flooded. The water tray method is a common strategy to achieve a high humidity environment.

When water a Venus flytrap, water until the soil is moist all around, but it is not muddy. Venus flytraps thrive in humid places, but they do not require swamp-like conditions. An environment with unnecessary moisture can actually cause issues, such as root rot (more on root rot prevention and fixes here).

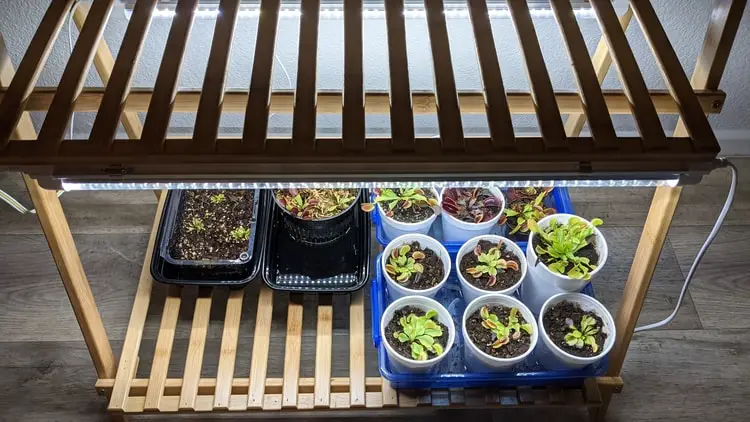
The water tray method is effective at keeping the soil humid, but not excessively. This is how you do it:

  • Place your Venus flytrap pot in a tray
  • Fill up the tray with pure water, up to 1 inch in depth
  • wait until the water in the tray dries up and refill
Venus Flytrap Humidity
Water Tray Method- Venus Flytrap

Finally, here are some ninja tips for watering Venus flytraps and keeping them thriving:

  • Reduce the watering frequency during dormancy. When Venus flytraps are dormant, they consume less water.
  • If you make a mistake and employ the wrong water for your Venus flytrap, follow the instructions in this article to save it.
  • Preferably water your plant from the bottom with the tray method. Watering from the bottom promotes root growth and prevents overwatering.
  • A combination of proper watering and suitable soil is critical to keeping Venus flytraps healthy. This article can help you choose the right soil for your plant: The Best Soil Options for Venus Flytrap (Plus Potting Tips)
  • Employ pots with drainage. It is challenging to water Venus flytraps appropriately when set in a pot with no drainage holes.

With this article, you have learned critical details on the Venus flytrap watering process. But, there are many other care considerations needed to keep Venus flytraps alive. For a complete overview, this article covers all you need to know about growing Venus flytraps: Ultimate Venus Flytrap Care Guide.

Can Venus Fly Traps Eat Rollie Pollies?

When feeding Venus flytraps, there are many different options. Rollie pollies are common insects in most gardens, but are they suitable food for Venus flytraps?

Rollie pollies (pill bugs) are an acceptable food alternative for Venus flytraps. Venus flytraps can consume rollie pollies small enough to fit entirely inside their traps. Still, employing rollie pollies can sometimes cause black leaves due to their hard shell.

This article will teach all the tips and tricks of how to feed roly polys to your Venus flytrap. Also, I will give you some alternatives for other food sources.

Can Venus Fly Traps Consume Rollie Pollies?

Venus flytraps feed on insects and arachnids to acquire key nutrients. Even though Venus flytraps don’t need bugs to survive, they benefit from having a meal every now and then.

Roly-poly bugs can be a good food source for Venus flytraps, as long as some basic considerations are followed:

  • The bug must be no larger than 1/3 of the side of the trap. When Venus flytraps struggle to consume a bug, they lose leaves. A general recommendation is always to choose smaller bugs that fit entirely inside a trap when it closes.
  • Only employ one bug and feed a single trap of the plant. Then, wait a few weeks before feeding another trap. Feed Venus flytrap only once every 2 to 6 weeks.
  • Skip a feeding if a leaf is still consuming a bug.
  • Do not feed your Venus flytrap during dormancy. During this resting period, the plant does not need any feeding at all.

Employing roly-poly to feed Venus flytraps have some pros and cons:

Pros for Roly-Poly as Venus Flytrap Food

  • Availability: They are available in most gardens.
  • Price: they are free; there is no need to purchase these bugs.
  • Appropriate size: An adult size roly-poly (5/18 inch) fits inside most traps (1-1.5 inches) of mature Venus flytraps.

Cons for Roly-Poly as Venus Flytrap Food

  • Hardshell: Roly-poly bugs have a hard shell, which can be difficult to diggest.

Roly-poly are readily available and of a suitable size to feed Venus flytraps. However, their hard shell can be a challenge. Venus flytraps have difficulties digesting insects with shells. When a plant struggles to consume a bug, it sometimes gives up. Then, the leaf consuming the bug dries up, blackens, and dies.

Employing roly-poly to feed Venus flytraps won’t kill the plant, but it might cause black leaves. When employing insects with shells, monitor the leaves and consider using another bug if the leaves wither.

Depending on your plant’s size and health, you might have a different rate of success employing roly-poly as feed. If you decide to employ them, monitor your plant and verify your Venus flytrap is not struggling to digest the bugs.

The following sections give you an overview of the Venus flytrap feeding process and some alternate food options for Venus flytraps.

The Venus Flytrap Feeding Process

There are two different approaches when feeding roly-poly to Venus flytraps: employing live feed or dead bugs. The processes are quite similar, but the latter includes some additional steps. You can follow the same steps below for other bugs too.

Employing Live Feed

  • Select a bug of the right size to feed inside a trap.
  • Grab the bug with tweezers or your fingers, and make sure to have full control.
  • Drop the roly-poly inside the trap. Aim for the center to activate the trap by touching the trigger hairs in the lobe.

This picture shows the trigger hairs inside a Venus flytrap leaf. There are three thin filaments arranged in a triangular pattern inside each lobe. Those are the trigger hairs that prompt the trap to close due to contact. The trap closes when a bug touches the trigger hairs twice within a few seconds.

  • The insect might try to escape, but the motion inside the trap should prompt the lobes to close and trap the prey.
  • Continue to observe the bug and the trap. If the bug escapes, you should be ready to capture it and try again.
  • Once the bug is inside the trap and is unable to escape, the lobes will close shut. This process might take a few seconds or even a couple of minutes. But eventually, the trap will close completely, and the plant will start secreting digestive enzymes.
  • Venus flytraps take several days and up to three weeks digesting a single bug. Do not be surprised if the plant does not reopen until a few weeks later.

Employ Dead Bugs

The process of feeding dead bugs is similar to live bugs but slightly more involved.

  • Select a right-sized bug for a Venus flytrap leaf. Consider that when a bug is dead, it is easy to break it up and employ a small piece rather than the whole thing.
  • Grab the bug with tweezers or your fingers.
  • Identify the trigger hairs inside the leaf.
  • Aim for the center and drop the dead roly-poly inside the trap.
  • Use your finger or a small tool (paintbrush, tweezer, chopstick…) and touch the trigger hairs inside the trap. Two taps will prompt the lobes to close.
  • Once the leaf is closed, you need to provide further stimuli.
  • Employ your hands or a soft tool to press both sides of the trap. Tap both sides until the lobes are sealed. It usually takes about 50 taps or a minute of stimulation.
  • After stimulating the closed trap, observe it and verify it does not reopen. Sometimes traps reopen when they do not receive enough stimuli.
Stimulating the Trap

The video below shows the process of feeding dead bugs to a Venus flytrap. It includes a step to rehydrate the bug, which is only necessary for freeze-dried bugs. I hope this video helps you get a clear idea of how the feeding process works.

For a complete overview of Venus flytrap feeding, make sure to read this article: How to Feed a Venus Flytrap – A Complete Guide with Pictures. The pictures are handy to guide you through the process without making common mistakes.

Alternate Food Options Besides Roly Poly

Besides roly-poly, there are many different bugs Venus flytraps can consume. Generally, Venus flytraps can consume almost any spider or insect out there. Still, there are some very popular food options available for free or for a low price.

Most pet stores carry live or dried up mealworms, bloodworms, or crickets. These three food options are inexpensive and extremely nutritious. I prefer to buy dried up insects because they can be stored for a long time. I can buy a container with hundreds of mealworms for less than 12 dollars, and it can last for years. In terms of nutrition, live bugs do not provide many added benefits. Choose between live or dead bugs depending on your feeding process preference. For example, some people hate handling live bugs and prefer the dried up options.

mealworms
Freeze-dried Mealworms for my Venus flytrap

Gnats, flies, and ants are also common food options for Venus flytraps. These three bugs hoover around most homes and gardens. They are commonly small enough to fit inside most Venus flytraps. However, they do not provide much nutritional value compare to bloodworms and cricket. The soft tissue for a small fly, ant, or gnat is tiny. Personally, I try to place my venus flytraps in windowsills or outdoors. There, they capture plenty of bugs on their own. Flies and ant are very common prey that is easily digestible and provides enough nutrition to the plant’s growth.

When Venus flytraps capture bugs on their own, there is no need to feed them. They are successful predators that capture enough bugs to absorb the nutrients they need. But, the access to bugs depends on the location of the plant.

The food options mentioned in this article are just a few examples. This article contains a detailed list of many more food alternatives for Venus flytraps.

When selecting a bug to feed your plant, you can experiment. Just make sure you employ a bug of the right size and only feed when necessary. Then, monitor your plant and assess how successful the feeding was.

Can You Skip Venus Flytrap Dormancy? (Best Strategies)

A vital care consideration for Venus flytraps is their dormancy period. Dormancy comes naturally for wild Venus flytraps, but at home, many growers wonder if skipping dormancy is a suitable approach.

Venus flytraps should not skip dormancy, as they need it to grow. Cutting dormancy 2 to 3 years in a row usually causes the plant to perish. Still, skipping dormancy in particular circumstances such as growing seedlings is a common practice.

In this article, I will cover all you need to know about skipping dormancy. I will give you specific examples of when you can skip dormancy.

Is Skipping Venus Fly Trap Dormancy an Option?

Wild Venus flytraps are exposed to cold winter weather. During that time, they experience dormancy. Dormancy is essential for the plant’s development.

Venus flytraps achieve dormancy after been exposed to temperatures below 45 F (7 C) for several weeks. Then, they must remain in cold weather for 2-3 months. In the spring, as temperatures start to rise, Venus flytraps exit dormancy.

Venus flytrap dormancy is an essential process that allows the plant to rest and remain strong in the growing season. Optimally, Venus flytraps should go dormant every year. But, for growers, it is not always possible to provide an appropriate environment for dormancy. In those cases, Venus flytrap owners often consider skipping dormancy regardless of the negative effects.

When Venus flytraps skip dormancy, their growth becomes stagnant compared to other Venus flytraps growing rapidly after dormancy (here is more information about each growth stage). Without dormancy, Venus flytraps are also less likely to propagate. Venus flytraps that skip 2-3 yearly dormancy periods in a row weaken and eventually die.

Skipping dormancy is never recommended, as the plant experiences many harmful effects due to the lack of dormancy. The most dangerous side effect is the deaf of the plant. Fortunately, the plant will only die if it skips several consecutive dormancy periods.

Venus flytraps can skip dormancy as long as it is not a recurring practice. The plant will exhibit a slow growth rate but will eventually recover as it goes dormant in the years to come.

Skipping dormancy is a suitable choice in some specific circumstances, such as:

  • When growing seedlings or leaf cuttings/ pullings
  • When you just got a new plant
  • When you are a short-term Venus flytrap owner

The following sections explain in detail each of the scenarios.

Growing Venus Flytraps Seedlings

In their natural habitat, Venus flytraps go dormant when they are seedlings or baby Venus flytraps. Seedlings can definitely go dormant in the appropriate climate. But, at their young age, it is possible to skip dormancy for the first year.

When you grow Venus flytraps seedlings, they are incredibly delicate. Caring for them is a difficult task. If you do not have much experience growing Venus flytraps and with the dormancy process, I recommend skipping dormancy for the first year.

In the case of leaf pullings and leaf cuttings, I have the same advice. Venus flytraps growing from leaf pullings grow quicker than Venus flytraps growing from seeds, but they are still tiny during the first year.

It is safe to skip the first year dormancy for Venus flytrap seedlings or leaf pullings. The plants will develop properly as long as they experience dormancy during the second year and continue to undergo a yearly dormancy.

seedling leaf pulling
Tiny Venus Flytrap Seedlings (Leaf Pullings)

New Venus Flytrap Plant

Some vendors indicate when was the last time a Venus flytrap went dormant. Then, when you buy the plant, you can determine if the plant should go dormant this year or not. Venus flytraps only require one dormancy period a year. If the plant already went through dormancy, it does not need another dormancy that same year.

In some other cases, Venus flytrap owners are not so lucky. When you do not have any information about your plant’s previous dormancy, it is hard to decide. Generally. I suggest one of these two approaches:

  • Make your plant go dormant if you have had it for a few months (3-4) and it has acclimated to the new environment.
  • Skip this dormancy period if the plant is still getting adjusted.

Dormancy won’t harm your plant if it is healthy, but weak Venus flytraps can die of shock due to the changes in the environment.

In the case you decide to skip dormancy, remember you need to make sure your plant experiences dormancy the following year (more tips below).

Short-Term Owner

It is estimated that Venus flytraps can live for more than 20 years. When plants experience a traditional growth cycle, they can live an extensive life. However, when Venus flytraps skip dormancy consistently, their lifespan shortens substantially.

Sometimes Venus flytrap owners decide to skip dormancy due to its difficulty. You can employ many methods to make your plant go dormant, but the easiest is to place the plant outside. However, the method is not effective without a cold winter.

Depending on your location, you can consider skipping dormancy if you are not planning to keep the plant for more than 2-3 years. Missing dormancy will kill the plant eventually, but in some circumstances, it is the only choice.

Is a Short Dormancy Acceptable for Venus Flytraps?

Optimally, Venus flytraps should go dormant for 2-3 months to experience the benefits of dormancy. However, such a long dormancy is not always possible. Some locations experience cold winter, but they only last a few weeks or barely two months.

There is no exact science of how long Venus flytrap dormancy needs to be. There is common knowledge that dormancy should take at least 2-3 months. In their natural habitat (North Carolina and South Carolina), Venus flytraps commonly experience more than 3-4 months of temperatures below 50 F.

The safest method to make your Venus flytraps go dormant is to place them outside in cold weather. Venus flytraps can experience full dormancy as long as they are exposed to cold temperatures for at least two months and a half (it takes a few weeks for the plant to enter dormancy).

Venus flytraps growing in locations with extremely short or non-existent winters should undergo dormancy with an alternate method: refrigerator dormancy.

Methods to Achieve Venus Flytrap Dormancy

There are two main methods to make your Venus flytrap go dormant: place them outside in cold winter weather or place them in the fridge for a few months.

The first option is the safest and easiest if you live in a suitable location. Venus flytraps need to be exposed to temperatures below 45 F (7 C) for 3-4 months to complete a full dormancy. When the plants undergo dormancy, they exhibit significant changes. They lose leaves and shrink in size to go into a hibernation state. During dormancy, Venus flytraps need slightly different care considerations.

  • Temperature: Plants should remain at the following temperature range: 32F – 45F.
  • Feeding: There is no need to feed Venus flytraps during dormancy.
  • Lighting: The lighting requirements decrease. Still, it is not harmful to provide lighting.
  • Trimming: Trim dead leaves when necessary.
  • Repotting: Repotting at the end of dormancy is a common and useful practice.
  • Watering: Venus flytraps need less water during dormancy

Make sure to learn about Venus flytrap care and dormancy ahead of time. This article gives covers all about growing Venus flytraps, including dormancy. Make sure to read it and download the free care sheet.

Refrigerator dormancy is more challenging as it has a higher probability of failure and requires a methodic approach. The video below explains the whole process.

Can Venus Flytraps Achieve Dormancy Indoors?

Venus flytraps can achieve dormancy only when exposed to cold weather. They won’t experience dormancy indoors if the environment is heated. However, some cold indoor locations are suitable for hibernation.

Venus flytraps can go dormant indoors in cold garages, basements, or a porch. Unheated locations with temperatures below 45 F are appropriate. Also, refrigerator dormancy is an alternate option.

For more information on growing Venus flytraps indoors, make sure to read this Guide. It covers all the care considerations for Venus flytraps growing indoors. In most cases, it is a challenge to grow Venus flytraps indoors, but it is completely possible to grow healthy plants. The Guide will help you succeed.

Recommended Products

If you are new at growing carnivorous plants or are looking to improve your current setup, these elements can make a huge difference.

In this article, I share some products I use to grow my carnivorous plants. I hope you find this list to be useful!

Recommended Products to Grow Carnivorous Plants

Carnivorous Plant Soil

Carnivorous plants need special soil to live. Here are some good examples of the required soil or their components, such as pure peat moss and perlite.

  • Carnivorous plant soil: https://amzn.to/3uVbg39
  • Pure peat moss for carnivorous plants: https://amzn.to/3vTqirs (you might find a cheaper option on local gardening stores, make sure you buy PURE perlite)
  • Pure perlite: https://amzn.to/3ppckLF

Artificial Lighting

You can use fluorescent or LED lights. Both types of grow lights are inexpensive and practical options. When choosing fluorescent bulbs, pick cool colors that promote growth.

I use this LED plant light for some of the Venus flytraps I own and my plants are thriving. The plant light has the appropriate lumen level and color spectrum. Also, it comes with a built-in timer to turn on/off automatically.

For multiple plants, you can employ these light fixtures: T8 LED light strips (6500k Cool White): https://amzn.to/3uWoeh2

T8 LED Fixtures

The T8 light fixtures do not come with timer functions; you will need an intelligent outlet like this: https://amzn.to/3fUdN9p

Plant shelf for indoor growing: https://amzn.to/3ppckLF

Pots and Growing Containers

The best potting containers for carnivorous plants have proper drainage and are made up of plastic, glazed ceramic, or Styrofoam. Venus flytraps prefer individual containers with a depth of at least 6 inches.

Nursery pots for single plants: https://amzn.to/34Q6byu

Net pot

Net pots for single plants: https://amzn.to/2TMqgDJ

Pots for large plants like, for example, Nepenthes: https://amzn.to/3fUnAMM

Useful Products for Watering

Total Dissolved Solids (TDS) meters are very useful to measure the water composition in your area. TDS meters measure the amount of minerals in the water. Those minerals can be very harmful for carnivorous plants.

Buy a TDS meter by following this link to Amazon.

ZeroWater water filters work well for carnivorous plants. It is the only water filter (that I am aware of 🙂 that filters dissolved solids. With ZeroWater, you can reduce the part per million (ppm) from tap water to bottled water to ZERO.

Drosera Capensis Care Instructions with Care Sheet

It can be a challenge to care for Drosera Capensis, as it requires a very specific environment. The list below includes key considerations when growing Cape Sundews.

  • Soil: Employ nutrient-free and fertilizer free soil—a mixture of peat moss or sphagnum moss with peat or silica sand is a suitable option.
  • Lighting: These plants need lots of light. You can employ artificial or natural light. The minimum amount of light exposure is 6 hours. Optimally, provide 8-12 hours of light.
  • Temperature needs: They need temperatures between 20 and 35 C (68 – 100 F) during the summer. During the winter, it is recommended that the temperature oscillates over 10 C (50 F).
  • Watering needs: Cape Sundews must remain in humid soil at all times. Water often or employ the water tray method to keep the soil moist.
  • Feeding: Only feed indoor plants; outdoor plants capture their own food. When feeding, employ bugs and only feed once or twice a month.
  • Trimming: Use sharp scissors to trim dead leaves when necessary. Please do not cut off leaves until they have entirely withered.
  • Humidity needs: Keep humidity levels between 40% and 70%. A humidifier is a practical solution to increase the humidity indoors.
  • Use of Fertilizers: It is possible to fertilize Sundews, but it must be done with care. Avoid fertilizing to prevent damage.
  • Dormancy: they do not require dormancy, but their growth can be stalled due to cold weather exposure.

Download this information in a pdf format:

In this article, I will expand on every detail you need to know about caring for Drosera Capensis. I will give you key strategies to keep them alive and healthy.

Drosera Capensis, also known as Cape Sundew, is a species of carnivorous plant. It is one of the easiest of this genre to breed in captivity. Some of the most remarkable characteristics of this marvelous carnivorous plant are:

  • It is a perennial carnivorous plant with rhizomatous roots and about 30 cm high.
  • The leaves are linear 6.5 cm long. These leaves grow directly from the substrate, which is why the plant lacks a visible stem.
  • Its leaves are covered with trichomes, hairs that secrete a sweet and sticky substance called mucilage, which serves to attract and trap its prey.
  • It produces numerous pink flowers of about 1 cm, which open at dawn and close at sunset. These flowers have a one day life only.
  • The flowers self-pollinate after closing and produce many small seeds, which fall from the bud once dry.

Some of the most common species that we can have in our garden are:

  • Drosera Capensis’ Wide Leaf’: Similar to the type species, but produces broader leaves. Vivid pink flowers
  • Drosera Capensis ‘Narrow Leaf’: it differs from the previous variety in the leaves, only 6 mm.
  • Drosera Capensis’ Red’: as the name of the variety indicates, it is red, the only characteristic that differentiates it from the ‘Narrow Leaf’ shape. Dark pink flowers.
  • Drosera Capensis ‘Albino’: It is also similar in shape to the variety ‘Narrow,’ but its flowers are white, and the trichomes of the leaves are transparent with pale pink glands.

Cape Sundews are native to the African continent, specifically South Africa, although we can find some varieties from Europe or Australia. In nature, they tend to live in humid places and soils low in nutrients, such as swamps, permanent water infiltrations, moist shrub formations at the edge of streams.

Drosera Capensis Care Guide

Now we will explain some of the most important cares that we must know to be successful with this plant in our wonderful hobby of gardening. First of all, we must understand that this plant is recommended to be kept outside, being more challenging to keep this species of carnivorous plant indoors.

Drosera Capensis
Drosera Capensis

Lightning Requirement

Cape Sundews need good lighting to develop correctly. They need at least 6 hours and optimally 8 to 12 hours of sunlight. Like all sundews, it grows very well in the shade, as long as it has very good artificial lighting, although it is recommended that it receive some hours of direct sunlight. It acquires a slight reddish tone when in contact with direct sun. It is essential to avoid the day’s central hours only in summer since it is likely that it could burn our plant if it is not well acclimatized.

Our recommendation for a healthy Cape Sundew is to place it in direct sunlight during winter. However, when summer arrives, we will have to move it to a place where it receives sunlight, but not directly since if the temperatures are too high, our plant could die.

Appropriate Soil

For this species, in particular, we must provide a substrate that maintains humidity well, has adequate drainage capacity, and last but not least, is low in nutrients and minerals. This is because, as we have said before, this carnivorous plant lives in places where the soils are relatively low in nutrients. Therefore, their roots are not prepared to absorb them.

An appropriate soil for Cape Sundews (this is the one I recommend) is a mixture of 50% pure peat moss and 50% perlite. Pure peat fulfills the function of retaining moisture without adding nutrients. On the other hand, the perlite will be in charge of granting good drainage to our substrate.

You can buy carnivorous plants, but making it is not complicated. This article teaches you many options of how to make carnivorous plant soil.

Watering Process

The Drosera capensis needs moisture at all times. For this reason, we must water it generally every two days. A good recommendation would be to water to employ the water tray method, put the pot on a tray with approximately 2.5 centimeters ( 1 inch) of water to absorb the water it needs.

One factor that we must consider when manually watering our Drosera Capensis is that we must avoid wetting our plant’s leaves since this is harmful to it.

Feeding Sundews

We should note that this is where beginners make most mistakes with these carnivorous plants.

Sundews feed in the following way:

First, it attracts and traps its prey, usually insects with the mucilage that it secretes. Later, when the slimy tentacles immobilize the insect, the leaves fold and surround the prey, while the mobile tentacles prevent the target from escaping. The plant acts as an external stomach, which secretes digestive enzymes that break down the prey’s proteins and form a nutritious slurry that is absorbed at the cellular level.

If our Sundew Cape is located outside, it is not necessary to feed it manually. It will search for the food it needs, attracting its prey with the mucilage it secretes. However, if our plant is inside our house and insects have no possibility of reaching the plant by themselves, we can try to feed it manually ourselves. If this is our case, we must bear in mind that this species of carnivorous plant feeds only twice a month, at most three.

When it comes to feeding it, we must add that we only have to provide it with small insects, such as flies or spiders. Likewise, we must avoid giving food such as meat, fish, or anything else that is not insects.

Dormancy Requirement

This type of carnivorous plant is of subtropical order. Cape Sundews do not have a hibernation time, but that doesn’t mean they won’t exhibit change. Depending on which area you grow them, and you have them outside, they also get a bit ugly if it is freezing, it is normal, and they can even lose all the leaves/traps until early spring, which is when they reappear from the roots. So if they become inconspicuous, don’t worry or think they’re dead, not at all. Just a little patience, and as soon as there are more hours of light, they will start to sprout again.

If the area where we live is too cold (freezing temperatures) and this happens, our recommendation is to store the plant in a covered place where the light will shine on it and wait for the winter to end, and place it outside again. It is essential that at this time of year, we do not stop watering it. Another critical factor is that it is not advisable to use heating where we place our plant.

Trimming Instructions

As the summer goes on, the plants begin to slow down their growth, withering more leaves than they create. It is an excellent time to clean the plants and thus prevent the fungus from appearing or rotting withered leaves and being an aesthetic issue.

First of all, we will need small and sharp scissors to have previously disinfected to avoid infections in the cuts. It would also be advisable to have a pair of tweezers to reach difficult places. Once this is done, we do not need anything else; take our plant and start pruning.

Prune all the leaves with a withered appearance or that the part of the trap has already dried. If there is still part of the trap without withering, we will leave it, especially if it has prey since it will always be feeding on it.

Once we have finished pruning, it may happen that much of the central trunk of the plant has been exposed, but there is no problem since we can bury it up to the part where the healthy leaves begin.

Temperature Needs

Cape Sundews will need temperatures between 20 and 35 C (68 – 100 F) during the summer. During the winter, it is recommended that the temperature oscillates over 10 degrees Celsius.

This carnivorous plant can resist high temperatures at 37 degrees ( and temperatures as low as freezing. However, it is not advisable to expose them to these extreme temperatures since they will not withstand them for a long time.

Optimal Humidity Levels

As we have already mentioned in this article, the substrate on which our plant sits must have constant humidity. Concerning environmental humidity, it must be between 40% and 70%.

To increase the humidity of our Cape Sundew, we must avoid spraying it with sprays directly. This is because it is not recommended to wet its leaves. We should not wet its leaves because it can affect the mucilage that it secretes to attract its prey.

The Use of Fertilizers

As we have already said before, this type of carnivorous plant lives in areas where the soil is poor in nutrients, and therefore, its roots are not adapted to absorb them. Due to this, these types of plants have been adapted to be able to hunt insects and thus supply their needs and obtain the necessary nutrients for their growth.

It is not recommended to add any type of fertilizers to the substrate of our Sundew. In the case of doing it, this can be more harmful than beneficial for our plant.

Cape Sundew Propagation

Drosera Capensis is a species of easy propagation, both by seeds and cuttings of leaves or rhizomes’ division. The simplest and most effective way is using seeds, characterizing that these have a high percentage of germination.

The leaf cuttings are obtained from healthy plants, and the method consists of cutting pieces of leaves and sowing in fertile substrate. Propagation by the rhizomes division is carried out by the “water float” method, where the rhizomes are placed in demineralized water until new seedlings start to form.

Dos and Don’t for Growing Cape Sundews

  • One of the mistakes that we often make is watering with inappropriate water for these types of plants. Although there is a type of water that is ideal for all plant beings, which is rain, it is very scarce in many places, and we will be forced to use other types. But we should never water with tap water if it is very hard. To check its hardness, we can do it with a TDS meter and introduce the sensor in the water; if it comes out a value lower than 100 (ideally between 0 and 50), we can water with it. Instead, employ distilled water, reverse osmosis water, or rainwater.
  • Fertilizers are beneficial for optimal plant growth; however, the roots of carnivores cannot absorb the nutrients directly. For this reason, we must avoid them.
  • We must try to touch the traps of our plant as little as possible, not to say that we should not touch them. In the event that hand feeding is necessary, we must try to ensure that only the insect comes into contact with the plant. If possible, we can place it on a single trap without touching the others, in the fastest and cleanest way possible.
  • We have a Cape Sundew that neither grows nor wanes, and we wonder why. Perhaps we have also noticed that the leaves get smaller, or even the roots come out through the drainage holes. It is highly likely that the main reason is that it does not have room to grow. Transplantation is a task that we will have to do every two years or so.

For information on carnivorous plant care, read this full guide: Carnivorous Plant Care Guide (From Beginners to Advanced)

Why Is My Pitcher Plant Closed and How to Fix It

Pitcher plants should have open pitchers ready to capture insects. But, in some instances, these plants keep their pitchers closed.

Pitcher plants close their lids due to insufficient humidity, improper temperature, dry soil, or other related factors. The growing habitat must be adjusted to encourage the pitchers to open back up. Open pitchers are ready to capture bugs and allow the consumption of valuable nutrients.

Close lids are commonly due to improper growing conditions, which can weaken and eventually kill your plant. This article will solve your doubts about why your pitcher plant is closed and teach you how to fix it.

Pitcher plant open and closed
An open pitcher and a closed one about to open

The pitcher plant is considered one of the largest and most striking carnivorous plants in the world. It has large, jar-shaped leaves, which serve to trap and digest small organisms. These death traps hang from spiral-shaped tendrils and are filled with acidic gastric juices. To prevent the digestive liquid from being diluted by rainwater and losing concentration, the trap has a small lid that protects the pitcher.

One of the headaches that growing Pitcher plants can bring us may be that the traps of our pitcher plant are closed. In this article, we will explore key care considerations to solve this problem.

Keep in mind that there are many types of pitcher plants with different requirements. Knowing which kind of pitcher plant you own is useful to assess their needs.

Within pitcher plants, there are different varieties. The most commons are:

  • Nepenthes Lowland: They endure temperatures from 25 C to 35 C, as long as their leaves are damp. These are characterized by being a little smaller and broader. Like most varieties of this species, it is brightly colored.
  • Nepenthes Howland: Like Nepenthes Lowland, its leaves must be moist at all times. The range of temperatures that it can withstand is a little wider since it can withstand temperatures between 15 C and 30 C. This plant has a reddish hue and can reach a larger size than the previous one.
  • Nepenthes Highland: Withstands temperatures from 10 C to 20 C. Physically they are very long and not very wide; they have an opaque hue.

Why Are Pitcher Plants Closed?

Pitcher plants have structures that resemble a “lid” over each pitcher. The lid can serve as protection from rain and the evaporation of its gastric juices. The top usually remains separate and does not close the pitcher completely. Three main problems cause closed pitchers:

  1. Lack of humidity: This is another of the main problems. Carnivorous plants, in general, need adequate environmental humidification. In this particular species, a humidity of even 75% is recommended.
  2. Dry soil: as in most carnivorous plants, they need reasonably moist soil to develop their roots.
  3. Keep them at an inappropriate temperature: something that also affects our pitcher plant and that many people overlook when they start in the world of gardening is the temperature at which we must maintain certain species, especially the most delicate ones. As we mentioned at the beginning of the article, there are different Nepenthes varieties, and each of them needs a specific temperature. If the weather at which we keep it is outside the range it can withstand, it could be why it is not opening its traps correctly.

How to Encourage a Pitcher Plant to Open?

The essential thing if your pitcher plant has its traps closed is to remain calm. We should not rush and try to find disproportionate solutions.

The most useful advice we can give you is to review all the environmental factors in which your carnivorous plant lives and determine if they are adequate or not.

To carry out this task, we must examine the three factors mentioned in the previous point, since the problem usually lies here in most cases.

Solution for Dry Soil

To know the first possible problem, which is the lack of humidity in the substrate, we must: touch the surface part of the substrate on which our pitcher plant sits, and if it is dry, it would mean that it does not have enough humidity. If this were our case, the best option would be to water it and start doing it more frequently. We remember that this species needs to be watered between every three and five days, depending on how hot it is in the place where we live. The soil must remain humid, but not damped and never dry.

For best results, make sure you use soil that provides aeration and retains moisture. This article can help you select the best soil for your pitcher plant.

Solution for Lack of Humidity

This point is somewhat more complicated to solve than the previous one since it refers to environmental humidity, but this does not mean that it is impossible. To know if this problem is the one that is causing the jars of our jar plant not to open, we must look at whether the other conditions are under control.

Some tricks that we can try to solve this problem could be:

  1. If our plant is located indoors (read the pitcher plant indoor care guide), a good option would be to purchase a humidifier and place it near it. Thanks to this device, we will be able to substantially increase the humidity in the air, thus favoring our plants in need of moisture.
  2. Another option to consider would be to keep it in a terrarium. We must keep this alternative in mind because, in addition to keeping humidity under control, we can also keep other variables such as temperature constant. In this case, we can increase the humidity inside the terrarium by introducing a humidifier or a dish with water to use the effects of evaporation to our advantage.
  3. The last and simplest trick to maintain adequate humidity for our pitcher plant would be to spray it manually. This alternative has its good part and its bad part. The good part is that we will increase the humidity substantially immediately. On the other hand, the bad part is that we will have to do it quite frequently, especially when the weather is hot.

Solution for Improper Temperature

Throughout this article, we have already mentioned the temperature necessary to care for this species in captivity depends on the variety we own since not all of them withstand the same temperatures. The tricks that we will mention in this section will serve equally for all varieties. You only have to adapt it to the variety to which your pitcher plant belongs.

The first option and the most comfortable in the long term would be to acquire the variety of pitcher plant that best suits the climate of the area in which we live. The benefits of making this decision are more than obvious. One of them is that we will not have to worry about adapting to the temperature that our carnivorous plant needs artificially.

If we have not taken this alternative, we must move our pitcher plant indoors when the climatic temperature is not within the range that the plant can withstand, either because it is too hot in summer or too cold in winter (it will depend on your plant’s variety).

Other Factors

Apart from these three factors, there are other more secondary factors. This does not mean that they do not play an important role in the development and correct functioning of our carnivorous plant’s system.

  • One of these factors could be to use a suitable substrate. Pitcher plants thrive in nutrient-less soil with good aeration and drainage. A 1:1 mixture of peat or sphagnum moss with perlite or silica sand are suitable alternatives.
  • Another critical point to keep in mind is that we should not make the mistake of adding some fertilizer. This action could damage our pitcher plant since they come from areas with soils poor in nutrients, and their roots are not adapted to absorb them. This is why they have adapted to be able to hunt insects and meet their needs to acquire nutrients.
  • Another problem that we must rule out if we observe that our pitcher plant is closed is that it may have some type of infection caused by a pest. This will be of vital importance to save our plant from possible death.

Once your Pitcher plant starts opening, you can start feeding it (this guide can teach you how to feed your pitcher plant properly) (this guide can teach you how to feed your pitcher plant properly). This guide can help you learn which bugs to employ and how to do it: What To Feed a Pitcher Plant: A Comprehensive List (Plus Feeding Tips)

Adjusting the growing environment can make a huge difference in your plant’s health and allow the pitchers to open up. If you need more information on pitcher plant care, this article: A Complete Pitcher Plant Care Guide (with care sheet) will give you all the information you need.

Why Is My Pitcher Plant Turning Black?

Black leaves are common in Pitcher plants. Dried up leaves are not necessarily a warning sign, as many different factors can cause them.

Their natural lifecycle usually causes black leaves in Pitcher plants; old leaves wither while new ones spur from the center. Black leaves can also be a sign of dormancy or poor growing conditions, such as excessive sunlight or lack of humidity.

This article will explore the most common causes of black leaves and methods to avoid losing leaves due to common care mistakes.

What Causes Black Leaves in Pitcher Plants?

Black Leaves Due to Standard Leaf Rotation

Pitcher plants take only about six months to develop pitchers, but they take 5-10 years to fully mature and flower. Their lifespan ranges between 10-20 years. They use sunlight, water, soil nutrients, and prey to survive. Throughout their lifespan, they will occasionally shed some leaves and pitchers that are too old. For every leaf drying up there, there should be a new one growing.

Pitcher plant black leaves
Black leaves before seasonal trimming

Do not be overly worried when you see a leaf drying up and turning brown. Most of the time dried up leaves are harmless in Pitcher plants. The image above shows a healthy Pitcher plant with several brown leaves and pitchers. Even though the plant has lost some leaves, it is healthy. It has produced more leaves and pitchers than before in the latest months.

The Dormancy Period

Some varieties of Pitcher plants undergo a period of dormancy in the winter. During that period, the plant tends to produce more black leaves.

The Sarracenia pitcher plant native in North America, for example, develops non-carnivorous leaves from Autumn until the end of winter, and some other leaves will turn brown and die.

Even Nepenthes, which are tropical pitcher plants, undergo some physical changes to cope with winter. The days are shorter at this time of the year in tropical regions, so the pitcher plants conserve their energy. They grow at a slower rate and will shed some dried leaves and pitchers. Turning black or brown is a sign that they are drying up and about to shed.

Black Leaves Due to Improper Care

Many different factors can cause an increase in black leaves in your Pitcher plant. If your plant is not dormant and you observe several leaves dying up, those can be caused by improper growing conditions. This section will help you examine your setup and ensure your plant is receiving proper care. Also, it includes some tips on how to avoid black leaves.

Watering Technique

Nepenthes grow best in moist but well-drained soil. Even the top layer of soil has to stay moist as carnivorous plants are native to bogs. An easy way to maintain this is with the tray method. Put the pot on a tray and keep about 1/4 inch of water on the tray at all times. Allow the plant to be watered from the bottom and try not to water from the top to avoid getting water inside the pitchers. It is only advisable to keep about 1/2 inch of water in the pitchers if it is particularly dry.

The water used for this plant can only be rainwater, distilled water, or reverse osmosis water. Nepenthes are native to nutrient-poor habitats, and too many minerals in the soil may over-fertilize the plants. Keeping them under roof eaves or downspouts is also advisable, so they get ample rainwater. They can sometimes tolerate tap water, but the amount of minerals in tap water may differ according to where you live.

Humidity Requirements

Nepenthes need high humidity. Pitchers will not grow; they can dry up and die in low humidity (less than 30%-40%). Dried up leaves and a lack of pitchers are common signs of improper humidity levels. If you do not have a terrarium that can control the humidity, you can keep a humidifier near the plants to replicate a humid environment. Regularly misting them with water in a spray bottle will also help.

Be wary of other organisms that also thrive in high humidity, though. Do not keep the pitcher plants in a completely closed container because fungi and mildew might grow inside and kill the plant. Allow sufficient natural ventilation in the terrarium as well by keeping it slightly open.

Lighting Requirements

Carnivorous plants, not just pitcher plants, generally need lots of sunlight. Without plenty of lighting pitcher plants stop producing fluid (this is how you solve the lack of fluid in the pitchers), Venus fly traps stop growing traps, and many other issues.. The Highland species can survive in partial sun while the Lowland species will need full sun.

Place Pitcher plants outdoors in a spot where they can get unobstructed sunlight. If they are being kept indoors, place them near windowsills facing any direction except North. They will not get direct sunlight through a North-facing window. If they are kept in a terrarium, it is better to use fluorescent tubes designed for plant growth and set the timer at 12-14 hours. Read the Indoor Pitcher Plant Care Guide for more information and effective strategies to grow Pitcher plants in your home.

Optimal Temperature

Pitcher plants are resilient to various temperature levels. Indoor room temperatures are appropriate for most types of Pitcher plants.

A standard temperature range during the growing season is 60 – 80 F (15 – 27 C). Pitcher plants prefer stable temperatures within 60 – 80 F (15 – 27 C).

You should double-check the specific species you own or plan to buy and adjust the temperature accordingly.

Soil Composition

Sphagnum Moss and Perlite Potting Mix for Pitcher Plants

Pitcher plants thrive in nutrient-free soil. The minerals and fertilizers in standard soil can kill these plants.

Employ a mixture of long-fibered sphagnum moss or peat moss with perlite or sand as Pitcher plants. Each of the elements in the soil must be pure and lack any nutrients or fertilizers.

Pitcher plants do not need rich organic soil as they are native to nutrient-poor habitats. Their consumption of insects makes up for the soil’s deficiency in minerals.

For best results, make sure you use soil that provides aeration and retains moisture. This article can help you select the best soil for your pitcher plant.

Feeding Needs

Carnivorous plants need supplemental feeding for optimal growth. It is recommended that the plants are grown in an area with natural access to prey, like on an open window leading outdoors so they can feed themselves. An insect or two per month is sufficient if the plant has not caught anything by itself. Freeze-dried insects are available in pet shops, and you can also feed them crickets, wasps, cockroaches, and flies. Do not experiment with human food; stick with an insect-only diet for your Pitcher plant.

The pitchers could trap bigger prey like lizards and rats, but this is not advisable to allow them to feed on them because they take a long time to be digested and only emit a rotting smell. Also, as the animal rots, the leaf will dry up and die.

Do you want to learn how to feed your Pitcher plant? This guide can help you learn which bugs to employ and how to do it: What To Feed a Pitcher Plant: A Comprehensive List (Plus Feeding Tips)

Use of Fertilizers

Pitcher plants generally do not need fertilizing, but it’s not particularly bad for them. Use foliar spray and be careful not to overdo it because Nepenthes are especially prone to being over-fertilized. Indoor plants can be fertilized with 10% diluted orchid food twice a month during the growing season. 

Excessive use of fertilizers can weaken the plant. Also, they can cause dried up leaves.

Are Dried up Pitchers Signs of a Dying Plant?

Not necessarily. Often, the Pitcher plants are just approaching dormancy, or the pitchers are old. Pitchers occasionally turn brown, dry up, then shed. It should only be a cause for alarm if the pitchers are drying up all at once outside dormancy season.

It could be tricky when the pitchers start drying up during Autumn, though. It is hard to tell if it is going dormant or dying and the only way to know is to wait out the dormancy season. The plant is fine if it starts growing late in spring or early in Autumn. If it doesn’t, then it only means it has died.

How to Prevent Pitcher Plants From Turning Black?

Caring for pitcher plants could be easy, but mistakes are easier to make, and they could spell the death of the plant if they’re not immediately addressed.

Remember that plants will only thrive in environments that mimic their natural habitat. Pitcher plants grow best in warm, humid, and bright conditions.

pitcher plant with no pitchers
Pitcher Plant with bright and healthy leaves

Follow this advice to keep your plant healthy and avoid losing leaves:

  • Avoid playing with the leaves or the pitchers. Touching the plant can cause stress and leaf loss.
  • Do not fertilize your plant. Only experienced growers should experiment with fertilizers.
  • Grow your plant outdoors with several hours (10+) of direct or indirect sunlight.
  • Plant Pitcher plants in carnivorous plant soil. Avoid standard using standard potting soil, as it is harmful for Pitcher plants.
  • Water frequently to keep the soil moist but do not flood.
  • Only employ nutrient-free water such as reverse osmosis water, distilled water, or rainwater.
  • Feed your Pitcher plant only if it lives indoors (this guide can teach you the basics of the pitcher plant feeding process). (this guide can teach you the basics of the pitcher plant feeding process)..
  • Only feed insects to pitcher plants, never experiment with human food or larger animals.

For more information on Pitcher plant care, make sure to download the complete care sheet here: Ultimate Pitcher Plant Care Guide.

How to Save a Venus Flytrap After Watering With Tap Water

Employing the wrong water for a Venus flytrap is a common mistake. If you have used tap water for your Venus flytrap, do not over stress. By acting quickly and following some simple steps, you can save your plant.

You can save a Venus flytrap after it has received tap water by draining the excess water, employing the correct water source, or repotting. Depending on the plant’s state, you can consider an aggressive approach such as repotting or just switching water types.

Employing tap water for your Venus flytrap can kill the plant. Follow the instructions below to save your plant.

Why is Tap Water Harmful to Venus Flytraps?

In their natural habitat, Venus flytraps have little to no exposure to nutrients from the ground or water. Such an environment led them to develop a carnivorous nature to supplement their diet by consuming insects. It has also made them intolerant to high concentrations of minerals or other nutrients, such as fertilizers.

Water for Venus flytraps must be pure. The presence of any additive can be harmful. For that reason, most tap water is unsuitable. Tap water contains dissolved solids that are harmless to most plants, but unsuitable for Venus flytraps.

Tap water quality can vary through different areas. In some locations, tap water is pure and contains less than 50 parts per million (ppm). Such tap water would work for Venus flytrap. However, it is not recommended to employ tap water unless you know its composition.

 It is possible to measure the ppm in the tap water at your home by employing a Total Dissolved Solids (TDS) meter. You can buy one online for less than $15 (link to some examples on Amazon.com). If you employ a TDS meter and the measurement is below 50 ppm, you can employ it for Venus Flytraps. In any other case, do not employ tap water.

Minerals in tap water accumulate in the carnivorous plant soil. Tap water does not kill Venus flytraps immediately, but it weakens them and creates yellow leaves. Eventually, Venus flytraps can die from drinking tap water.

Since tap water is almost always unsuitable for Venus flytrap, it is best to employ any of these three pure water sources:

  • Distilled water
  • Reverse osmosis water
  • Rainwater

Ensure your plant stays healthy by employing the correct water.

Venus flytrap
Healthy Venus Flytrap

Step by Step Guide: Save a Venus Flytrap After Watering With Tap Water

If you have used tap water for your Venus flytrap, follow the steps in this section to save your plant.

Assess the Damage on Your Plant

Some Venus flytraps are more resilient towards dissolved solids in tap water. Depending on the size, age, variety, and state of a Venus flytrap, your plant might respond differently to tap water. In this section, you must determine the state of your plant.

When assessing the damage, remember that black leaves are not necessarily a sign of poor health. It is normal to have a couple of dried up leaves every now and then. Still, if a plant is losing leaves without growing new ones, it a discouraging sign. Yellow leaves are a common sign of unhealthy conditions. Yellow leaves arise from mineral burns (due to employing tap water, for example)

Now, you must to classify your Venus flytrap into one of these categories:

  • No Changes: You have used tap water for your plant but haven’t observed any differences yet. The plant is still healthy. It exhibits healthy leaves and new growth.
  • Minor Damage: The plant looks down lightly, either by having one or two yellow leaves.
  • Medium Damage: The plant exhibits multiple yellow leaves.
  • Major Damage: Almost all leaves are compromised. You are afraid the plant might run out of traps.

Do your best to determine the state of your plant based on the categories. If you are in between two categories, I recommend selecting the one with greater damage to be safe.

Implement the Action Plan to Save Your Venus Flytrap

Depending on the state of your plant, there are different action steps you can take. Read the step-by-step guide that matches the observed damage in your Venus flytrap, and follow the instructions carefully.

Your Venus Flytrap Exhibits No Changes:

You used tap water for your Venus flytraps. And even though it is not recommended, your plant appears to be fine. Right now, you can’t notice any damage. That is great news!

If you are in this category, you do not need to do much, focus on these two items:

  1. Go to the grocery store and buy distilled water (you can also use reverse osmosis water or rainwater, but they are harder to obtain)
  2. Drain any excess water from your plant. If there is any water in the plant tray, toss it.
  3. Water your plant only with distilled water from now on.
  4. Continue to monitor in the next weeks. If it starts exhibiting some minor damage, follow the actions steps for minor damage (next section)
  5. Read the last section of this article and make sure you are taking good care of your plant during the recovery process

Your Venus Flytrap Exhibits Some Minor Damage

It is a good sign that a Venus flytrap only exhibits minor damages. You do not need to take an aggressive approach. Still, it critical that you complete the following steps:

  1. Extract as much water as possible: Let your plant drain any excess water by tossing any water in the tray and squeezing the pot lightly (if possible).
  2. Buy distilled water or obtain reverse osmosis water or rainwater.
  3. Water your Venus flytrap from the top until water comes out of the drainage hole. Repeat this process a few times to drain some of the old water and potentially clean up the soil from mineral buildup.
  4. Continue to water with pure water; avoid tap water at all costs.
  5. Continue to monitor in the next weeks. If the plant gets worst, follow the actions steps for medium to major damage (below)
  6. Read the very last section of this article. And make sure you are providing the best care to accelerate the recovery process.

Code Red: Medium to Major Damage on Venus Flytrap

Unfortunately, your plant is not looking very good at this time. But there is hope. Venus flytraps are resilient plants; they can recover from unsuitable growing conditions. You will need an aggressive approach to save your plant: you will repot the plant in new soil. Also, you will need the following items:

  • Carnivorous plant soil (This article can help learn where to buy this special soil or how to DIY)
  • Pure water (distilled, reverse osmosis, or rainwater)

Now, follow these instructions to repot your plant:

  1. Remove your Venus flytrap from its pot and soil.
  2. Use pure water to clean the roots of the plant and remove all the soil.
  3. Toss the old soil away
  4. Add fresh new soil to the plant pot. It you need to upsize or change your pot, this guide has recommendations.
  5. Pot your Venus flytrap in the new soil
  6. Water the plant with pure water until the soil is humid all around.
  7. Continue to care for the plant and monitor its health. You should observe new growth within the next 1-2 weeks. New leaves spurring out is a great sign!
  8. Follow the care advice in the last section to accelerate the healing process.

Potting and repotting a Venus flytrap can be a delicate process. If you have never done this before, I recommend reading this guide: Venus Flytrap Repotting Guide. It has pictures and instructions to ensure the repotting goes smoothly.

Care During Venus Flytrap Health Recovery Process

You have taken the necessary steps to save your Venus flytrap. Now, it is time to be patient and wait for your plant to get better.

 I do not recommend making any major changes during the recovery process besides the ones you already implemented. Still, this care advice can help you increase the chances of recovery

  • Avoid feeding the plant: Let your plant focus on healing rather than capturing bugs.
  • Do not fertilize: Do not attempt to fertilize to speed up the process. Fertilizers can also kill Venus flytraps.
  • Continue to water as usual: Make sure the soil is always moist. Venus flytraps thrive in humid environments.
  • Trim dead leaves: Consider trimming any dead leaves to encourage growth.
  • Do not play with the leaves and avoid any extra stress.
  • Always use carnivorous plant soil: Here is a guide that lists the best soil options.

Making mistakes when growing Venus flytraps is normal. Carnivorous plants have particular needs! To ensure your plant remains healthy, I recommend downloading the Venus flytrap care sheet. You can download it from this article: Ultimate Venus Flytrap Care Guide.

Also, if you grow Venus flytraps indoors, this growing guide can help you perfect your setup: Venus Fly Trap Indoor Guide.

Is Boiled Water Safe for Venus Flytraps?

Employing the right water type for Venus flytraps is critical to keep them alive and healthy. Most tap water is unsuitable for Venus flytraps, but would boiled tap water work?

Do not use boiled tap water for Venus flytraps. Boiling the tap water won’t remove minerals and other dissolved solids that are harmful to Venus flytraps. Only water Venus flytraps with distilled water, reverse osmosis water, or rainwater.

In the wild, Venus flytraps grow in nutrient-free environments. They have little to no access to minerals and other elements. As a result, Venus flytraps have developed an intolerance to nutrients.

Water with dissolved solids can kill Venus flytraps. For that reason, Venus flytrap owners must ONLY employ pure water sources.

Not all tap water is unsuitable for Venus flytraps. Tap water quality and composition can vary throughout cities or even neighborhoods.

A TDS meter can measure the total dissolved solids in the water. A measurement below 50 parts per million (ppm) indicates an acceptable water source. A low measurement is good for Venus flytraps. If you have a TDS meter or can buy one, you can check if the tap water in your home is good for watering your plant. You can buy a simple TDS meter on Amazon for less than 20 dollars; here is a link to some options.

Boiling tap water won’t make it suitable for Venus flytraps. Boiling the water will evaporate part of the liquid while keeping all the dissolved solids. This process actually increases the concentration of dissolved solids, making boiled water more harmful for Venus flytraps.

Boiling water is not a solution to obtain pure water for Venus flytraps. But, do not worry; you can obtain the right water for your Venus flytrap easily and at an affordable price.

What Water Can I Give My Venus Fly Trap?

Venus flytraps require pure water sources to survive. Water with minerals or any additives can kill Venus flytraps.

To keep a Venus flytrap healthy employ only these water sources:

  • Distilled water
  • Reverse osmosis water
  • Rainwater

All three of these water sources are good for Venus flytraps. None is better for the health of the plant. But, when choosing one, there are some related considerations, such as price and availability.

  • Rainwater: You can collect rainwater for free and use it to water your Venus flytraps and other plants. But, collecting rainwater requires prior planning. Some people build a system to collect water from their roofs and then store it. In one way or another, you will have to figure out a system to collect rain, especially if rain does not come often. Another challenge with employing rainwater is its natural availability. Some locations receive little to no rain, making this option impossible.
  • Distilled water: You can buy distilled water in most supermarkets or water stores. Supermarkets sell a gallon of distilled water for a dollar or less. And water stores can sell you a gallon of distilled water for 25 cents or less. I bought a 5-gallon jug for my Venus flytraps. When I ran out of distilled water, I take the jug to the water store and refill it for less than a dollar and a half. It is an inexpensive and practical solution.
  • Reverse osmosis water: Sometimes, you can find reverse osmosis water in supermarkets, but in most cases, you will need to buy it in water stores directly. Reverse osmosis water is more expensive than distilled water. Most stores sell 1 gallon for 50 cents to 1 dollar.

Rainwater is not an option for me as I live in an arid location. Between distilled water or reverse osmosis water, I prefer distilled water. It does not provide any additional benefit for my plants, but it is cheaper and easier to buy. If you buy distilled water in the supermarket, make sure to read the label. The water must be pure, and it should not contain any additives for taste.

It is possible to make distilled water for Venus flytraps at home. Follow the link for a step-by-step guide.. The process is not complicated, but it can be time-consuming.

The video below explains how to make distilled water at home. You only need a pot with a lid, tap water, ice, and a medium-size container.

How to Water Venus Flytraps

After you have collected, made, or purchased the right water source, it is time to learn how to water a Venus flytrap.

Venus flytraps require high humidity environments. They need to be watered constantly to thrive. But, they do not like to sit on standing water. When watering a Venus flytrap, moisten the soil until it is humid throughout. Before watering again, wait until the soil is less humid.

Do not flood the soil when watering Venus flytraps. Venus flytraps thrive in high humidity environments, but they do not like excessive moisture, leading to root rot and mold issues.

You can water Venus fly traps from the top or the bottom. Watering from the top is the usual method while watering from the bottom is less common.

I prefer to water Venus flytraps from the bottom. Watering them from below promotes root growths and prevents overwatering.

The process of watering from below is simple. Just place the Venus flytrap top on top of a tray and add some water. Fill the tray until 1 inch in depth. Them, you can let the plant consume the water. Refill the tray as soon as it dries up.

Venus Flytrap Humidity
Venus Flytrap Tray Method

Watering Venus flytraps from the bottom is commonly referred to as the Water Tray Method. It is not only employed for Venus flytraps but with other carnivorous plants as well.

Mastering the process of watering Venus flytraps is essential for the plant’s health. In this article, you have gotten essential information regarding which water keeps Venus flytraps healthy and which water can kill them. But there is more to learn. This article can teach you how to water Venus flytraps appropriately through different seasons and climates. It includes all you need to know about the watering process.

You can also learn more about the watering process in this video. It is a short but detailed explanation.

Are Venus Flytraps Good for Pest Control?

Venus flytraps are fantastic plants to own. Many people buy them to control the bug population at home. But, are Venus flytraps good bug controllers?

Venus flytraps can capture bugs and reduce the bug population at home, but they are limited to consuming 5-10 bugs a month. The plant’s size restricts them from capturing large bugs. Other carnivorous plants, such as Pitcher plants, are more effective bug controllers.

Depending on your situation, employing Venus flytraps as a bug control can be a good idea. This article will teach you how effective Venus flytraps are as pest control and some alternate solutions.

Venus Flytraps for Pest Control

Having pests in your home or your garden can be a big problem. A few insects crawling around is not a big deal, but it can be bothersome and a health risk once the number increases.

Venus flytraps sometimes come to mind when thinking about pest control options.

Venus flytraps evolved to develop bug trapping mechanisms. Their leaves are modified to look like jaws. The plant uses its traps to capture and consume bugs. But, how effective are Venus flytraps for bug control?

Venus Flytrap Effectiveness

Venus flytraps have some limitations when measuring their effectiveness as pest control.

Venus flytraps are effective predators. They capture enough bugs to supplement their diet. But, as pest control, a single Venus flytrap is limited to capturing less than a dozen small bugs per month. Also, Venus flytraps only attract insects searching for nectar.

The number of bugs Venus flytraps can capture is limited by their size, trapping mechanism, digestion process, and dormancy.

b 52 venus fly trap

Size: Venus flytraps are small plants. Mature Venus flytraps grow about 5 inches in diameter and develop trap sizes that reach an average of 1- inch in length. Venus flytraps can consume various arthropods, but their catching effectiveness lowers substantially with large bugs.

Venus flytraps consume bugs that can fit within a trap. With 1-inch traps, they can capture most flies, gnats, and ants, but larger bugs such as roaches or crickets are usually too large for the plant.

Also, Venus flytraps only grow up to 5-7 traps at a time. So, in the unlikely scenario, all the traps are full, the plant would have only captured a handful of bugs.

Trapping mechanism: Venus flytraps employ a snap trap mechanism to capture prey. They produce tweet nectar inside their traps to attract potential victims.

Technically Venus flytraps can consume almost any insects and arachnids. But, because they use sweet nectar to attract prey, only nectar-eating bugs are common victims. The sweet nectar attracts these insects:

  • Ants
  • Flies
  • Bees
  • Moths
  • Mosquitoes
  • Beetles
  • Wasps

Venus flytraps are much more effective at capturing nectar-loving insects more than anything else. Yes, sometimes Venus flytraps capture other insects, but it is less likely.

Digestion process: Venus flytraps can capture bugs in just a few seconds, but the digestion process takes several days. Small bugs are consumed in 7-10 days, and large bugs can take up to 3 weeks.

During digestion, closed leaves are inactive to capture bugs. Each leaf will only be ready to capture prey once the digestion process is complete and the leaf is fully open again.

Dormancy: Venus flytraps experience a dormancy period during the winter. If a Venus flytrap lives outdoors and goes dormant during the winter, it stops capturing bugs.

Dormancy is similar to hibernation. A Venus flytrap rests and stops performing non-essential functions. Unfortunately, dormant Venus flytraps stop capturing bugs for 2-3 months.

Even though Venus flytraps have limitations as a pest control option, they can still provide some benefit. The next section will help you implement Venus flytraps as bug controllers.

How to Use Venus Flytraps as Bug Controllers

Venus flytraps can be used as bug controllers in homes, gardens, or greenhouses.

Venus flytraps are effective at capturing the occasional bug at home. But, they won’t eliminate a whole plague. If you notice a consistent number of pests at home, consider contacting professional help.

I place some of my Venus flytraps on a windowsill at my apartment. I do concurrently have any pest control needs, but my plants help capture the occasional fly and benefit from consuming it!

Outdoors, Venus flytraps are effective predators. But, controlling plagues within a garden is a challenging task for only a handful of Venus flytraps. Due to bugs’ availability outdoors, I would recommend employing other types of carnivorous plants (more information in the last section) or getting professional help.

It is possible to control the bug population inside greenhouses with Venus flytraps, but you will need multiple plants to observe the positive effects. Pitcher plants or sticky leaf carnivorous plants are commonly employed in greenhouses as bug controller due to their high effectiveness as bug controllers.

Care Consideration for Venus Flytraps

If you decide to buy Venus flytraps and use them to control bugs, you must learn about caring for your plants.

Venus flytraps are unique; they have precise growing requirements. The list below summarizes the most important considerations:

  • Light: Venus flytraps need plenty of light. Place them under partial or direct sunlight for at least six hours a day. Optimally, they should receive 12 hours of light.
  • Watering: Only water Venus flytraps with rainwater, distilled water, or reverse osmosis water. Water frequently to keep the soil moist but do not flood it.
  • Soil: Only employ nutrient-free soil. Pure sphagnum moss or peat moss are viable options. Mixing moss with sand or perlite can help promote drainage and aeration.
  • Trimming: Remove black leaves by cutting them off after they dry up completely.
  • Temperature: Keep Venus flytraps between 32 F (0 C) and 95 F (35 C).
  • Humidity: Venus flytraps can adapt to arid climates, but they benefit from high humidity environments.
  • Dormancy: Venus flytraps require a yearly dormancy period during winter.
  • Feeding: Venus flytraps benefit from capturing bugs.
  • Repotting: Repot once a year.
  • Fertilizers: Do not fertilize.

Follow the care considerations in this list and avoid killing your Venus flytrap. Also, for more in-depth care instructions, read the Ultimate Venus Flytrap Care Guide. It is a fantastic resource for beginners!

Other Carnivorous Plants for Pest Control

Some people employ carnivorous plants as bug controllers. Carnivorous plants can be a solution for specific pest control scenarios, but different carnivorous plant species provide different benefits.

The three most effective carnivorous plants for pest control are Pitcher plants, Sundews, and Butterworts. Here is an overview of each:

Pitcher Plants: These plants characterize by pitcher like structures that attract bugs. Bugs are lured by sweet scent. Then, if the victim slips inside the trap, slippery surfaces prevent the bug from scaping.

Pitcher plants can capture dozens of bugs at a time in each pitcher. Also, each pitcher plant has multiple pitchers ready to capture and consume bugs.

Nepenthes Pitcher Plant

Butterworts: Butterworts or Mexican butterworts have beautiful flowers and sticky leaves. The leaves characterize by having a strong adhesive substance. As insects walk through the leaves or land in one, they get stuck. When bugs attempt to fight their way out of the adhesive surface, they end up getting stuck more and more.

Butterworts take their time digesting their victims. The plant secretes enzymes to digest the bug and slowly decomposes it.

All the leaves within the plant are capable of capturing and digesting prey. The only factor that limits how many bugs get stuck to the plant is the leaves’ size.

Mexican Butterwort

Sundews: Sundews, also known as Drosera, are effective bug controllers. They come in many different shapes and sizes, but their big trapping mechanisms act similarly. These plants employ their adhesive leaves to capture bugs.

Bugs that get stuck to the tentacles of the plant end up becoming food. Mature Sundews can capture more prey and larger bugs due to their size.

Sundew
Sundew

Before selecting a specific species, research their care requirements. Some carnivorous plants prefer tropical climates; others need different seasons, such as warm summers and cold winters. Choosing a plant that grows well in your location will help you keep them healthy and ready to capture bugs.

You can learn about different carnivorous plants, including Sundews, Butterworts, and Pitcher Plants in this article: 10 Fascinating Types of Carnivorous Plants. It includes descriptions, care considerations, and tips.